This guide will help you through the basics to Setup your broadband router.
Box Contents
- 1 x Velkin Router
- 1 x ADSL Line Cable (RJ11)
- 1 x Ethernet Cable (RJ45)
- 1 x Power Supply
- 1 x Setup CD
- 1 x Mircofilter
- 1 x Manual
On the front of the router you should see the following icons and below is a table to show you what each ones means.
Power LED
 |
Off | Router is off |
| Green | Router is On | |
| Red | Router Failed to Start |
LAN Status LED
 |
Off | No device is connected |
| Orange | Ethernet link is up and 10Base-T device connected |
|
| Orange – Blinking | When 10Base-T device transmitting or receiving data |
|
| Green | Ethernet link is up and 100Base-T connected |
|
| Green – Blinking | When 100Base-T device transmitting or receiving data |
Wireless Lights
 |
Off | Wireless LAN is Off |
| Green | Wireless LAN is On & Connected | |
| Green – Blinking | When sending or receiving Data |
ADSL Lights
 |
Off | No ADSL Connection |
| Green | ADSL Link is up and connected | |
| Green – blinking | negotiating Connection |
Internet LED
 |
Off | No Internet Connection |
| Green | Connected to the Internet | |
| Green – Blinking | When transmitting or receiving data | |
| Red | Failed to get IP |
Back of Router
Below is what you should see on the back of the router and this is where you will need to plug in some cables either to your phoneline.
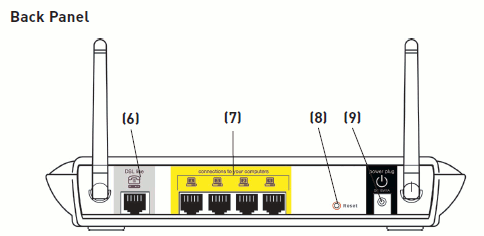
Number 6: – DSL Socket
Number 7: – 4 100mb LAN Sockets
Number 8: – Reset Button
Number 9: – Power
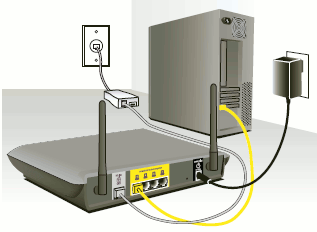
Below is a diagram of how the cables should be connected.
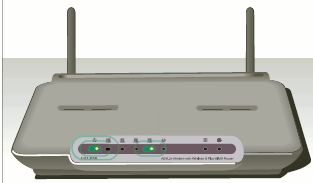
Below is a diagram of the router with some of the lights on.
To Setup the router you can either put in the supplied CD that came with your router and follow the instructions. It will then ask you to enter your broadband details which we will have sent you in a letter or you can find out by calling the helpdesk.
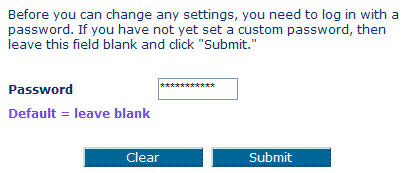
You can also go via your web browser at: http://192.168.2.1 . You can then see the following box and type in a password
You should be presented with a wizard so you can setup your router. It should ask you to enter the following:
Country: UK
ISP: Other
Select Next, then ojn the next screen you will need to enter your Suffolk Online Username & Password for your broadband connection. Remeber: This is not the same as your email username and password.
Username: t******@suffolkonline.net
password: this came with your welcome letter. (*If you are insure of this you can call the helpdesk and we can provide this to you)
You will need to enter in your password twice, Once this has been done simply press Next.
The Next screen will ask you to setup an SSID for your wieless network. The Default is: Belkin_G_Plus_Mimo. (This may change depending on the model you purchased).
You can change this to something you know off but this will be what you use to identify your wireless network when connecting a laptop or wireless device to it. Leave the wireless Channel at 11 as this is proberly what would be the best setting unless you have great interferance then change it to another channel.
Once you have entered all this information you will need to click submit and will get a summery screen so you can make sure you have entered everythign in correctly then simply press save & reboot.
This will have setup your router and so all green lights. If it doesnt then either retrace your steps via this guide or call the helpdesk.
Once you router or Modem is setup
Once your router has been setup, physically all the cables are in the right location then all you should need to do is open your Internet Browser, i.e Internet Explorer, Google Chrome or Mozilla Firefox and it should then work via broadband. If it comes up with a box asking you to connect to a connection then cancel this and follow the below instructions.
Click Start
Click Control Panel
Double Click Internet Options
Click Connections along the top
Select “never dial a connection” from the middle selection options
Click OK