Click here for Suffolk Online Webmail
You can also access Suffolk Online Webmail by clicking on the link above or by going to the main Suffolk Online Website at https://www.suffolkonline.net and selecting Webmail on the top right of the page.
Webmail Basics
The new look webmail can still be found at https://webmail.suffolkonline.net All you need to do is to login using your Suffolk Online email address and password.
The first thing you will see is your Inbox.
Basics
Folders are arranged down the left hand side. The emails for the selected folder appear in the middle of the screen and the selected email appears on the right.
The menu bar at the top of the screen allows you to navigate around the webmail and also access settings and help.
How to send a new E-Mail
To compose a new email, users should simply select the “compose” button from the top of the menu. This will present the following display:
1. Enter the recipient’s E-Mail address in the To field of the sidebar. If you want to send to more than one person, add the additional addresses and Press Enter.
2. Enter a subject for the email in the subject field.
3. Type your email
4. Click on Send.
Adding Attachment
If you want to add attachments to the E-Mail such as documents or photos, click on the paperclip button, select the file you want to send by double clicking on it and then sending the email.
Create and manage folders
To create a folder click on the “suffolkonline.net” heading down the left hand side, click the 3 lines and then click the Add New Folder button A box will pop up asking you to name your new folder. Enter your desired folder name and press Add Folder.
To add emails to folders simply drag and drop them from your inbox in to the desired folder.
Managing Your Address Book
You can access your address book by clicking on the Address Book icon (9 small dots in a box formation) in the menu bar at the top of the screen.
The Address Book View provides a view of the users contacts and the ability to add new contacts and group them in distribution lists.
In order to create a new contact, you must at least enter one name in the New Contact window. All other data is optional.
You can search for contacts by clicking in the search box. In order to display contacts with a certain initial letter, click a letter in the navigation bar.
Click on a contact in the sidebar. The contact’s data is displayed in the display area.
Setting Up a Signature for you email
You can set up a signature which will be seen at the bottom of all your messages. All you need to do is:
1. Click on Settings.
2. Choose Email from the left hand menu.
3. Click on Signatures
4. Click Add new signature. Once you have created the signature, you will see it as an option when you compose an email so you can select the signature from the list.
Webmail Portal
Along the top of the menu bar is an option called Portal. This is a very useful feature of the webmail. It is from here that you can really personalise the service to suit you.
In the top right hand corner you will see the option to Add Widget.
This will give you the option to add commonly used programs to the portal page so that they are easily accessible for the Portal Page. You can choose from:
- Appointments – This will show any forthcoming appointments you’ve set up in your Calendar. Clicking on it will open your calendar
- Birthdays – It will display the birthday of anyone in your address book if you have added it to their contact.
- Facebook – Use this shortcut to login.
- Inbox – When you click on Inbox, the E-Mail app opens. If you click on an E-Mail, a pop-up opens which will display the E-Mail’s contents. To delete, reply to or forward the E-Mail, click on the respective button in the pop-up.To compose a new E-Mail, click on the Compose new E-Mail list item.
- LinkedIn – Use the portal to login to this site.
- Quota – Displays the current quota used on your account on the server.
- RSS Feed – Use this feature to manage your RSS feeds.
- Tasks – If clicking on Tasks, the Tasks app opens.If clicking on a task, a pop-up opens. The pop-up shows the appointment data.
- Twitter – login using this shortcut.
- User Data – Includes links for the following functions: Change your personal contact data and change your password.
Address Book & Contacts
You can access your address book by clicking on Address Book in the menu bar at the top of the screen.
The Address Book View provides a view of the users contacts and the ability to add new contacts and group them in distribution lists.
The icon creates a new contact or a new distribution list. In order to create a new contact, you must at least enter one name in the Add contact window. All other data is optional.
You can search for contacts by clicking on the search icon. In order to display contacts with a certain initial letter, click a letter in the navigation bar.
Click on a contact in the sidebar. The contact’s data is displayed in the display area.
Add a contact from an E-Mail’s vCard attachment:
1. Select an E-Mail with a vCard attachment in the E-Mail application.
2. Click on the attachment’s name in the display area. Click on Add to address book in the menu.
Send an E-Mail from within an address book:
1. Select a contact or a distribution list from the sidebar.
2. Click on email in the display area.
Changing How the Contacts are Displayed
1. Click the cog icon on the right side of the menu bar. Click on Settings in the menu.
2. Click on Address book in the sidebar.
3. Change the settings. You can change how you display the contact by choosing Display of names This. specifies the order in which a contact’s first name and surname are displayed in the address book.
Changing Your Password
It is important that you keep your password secure and you can update your password through the webmail interface.
If you have forgotten your password and need to have it reset, please contact our Technical Support Team on 01473 345305.
How to update your password:
You can change your password in the Settings. Click on the cog icon and then select Settings. and you will be taken to the Basic Settings options. Click on Change Password to update the password.
Anti-spam Controls
As part of our recent email upgrade, one of the great new features of the system is the new and improved anti-spam controls and also the ability for you the user to tailor these to your needs. If you want to block (blacklist) or allow (whitelist) specific emails you can now do this yourself without calling the helpdesk.
Since the upgrade you may find that some genuine emails have gone into the “quarantine” folder. This is to be expected and is just part of the system learning which emails are genuine and which aren’t. You now have control over how you deal with these.
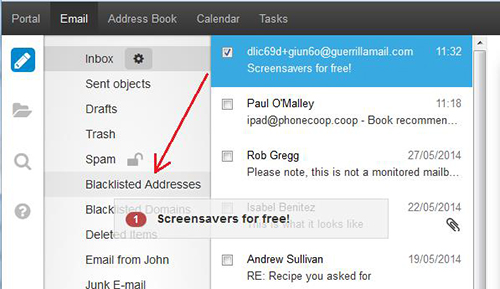
Blacklisting
Blacklisting is a way of stopping emails from a given address or domain from reaching your inbox, it’s a useful way of blocking nuisance emails from a given address. To do this simply go to www.suffolkonline.net and click on webmail along the top. Once you are on our webmail page, type in your full email address and email password and then from here you will be control your spam emails. From here you simply drag and drop the email in question over to the Blacklisted Addresses folder. If you want to block all emails from that domain drag the email in to the Blacklisted Domains folder.
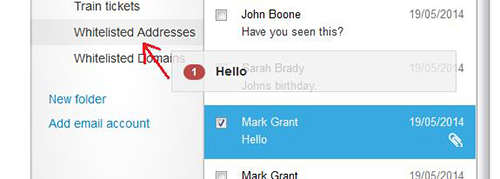
Whitelisting
As the name suggests whitelisting is the opposite of blacklisting. If you are having issues with email from a particular address showing up in your spam folder instead of your inbox, you can drag an email from this account or domain into the Whitelisted Addresses folder. We would not recommend whitelisting an entire domain. Only add addresses that you trust to your Whitelisted Addresses folder.
Illustrated Guide
To download our illustrated guide of our webmail system please click below.
For information on how to ammend your spam controls please see our spam page here
If you have any problems using the system please let us know by calling 01473 345305 or email us at[email protected]